lady macbeth dress John Singer Sargent Print, Ellen Terry as Lady Macbeth – GalleryThane
SKU: 59019190516
lady macbeth dress

lady macbeth dress John Singer Sargent Print, Ellen Terry as Lady Macbeth – GalleryThane

Sale price$24.78 Regular price$27.53
Save 10%
Size: 4

Shipping Estimate
USA
  • USA
  • CAN

Ships within 48 hours · Estimated delivery Jul 7 - Jul 12

Promo Codes Available:

For Your Every Summer RSVP, with Code: SUMMER15

Description

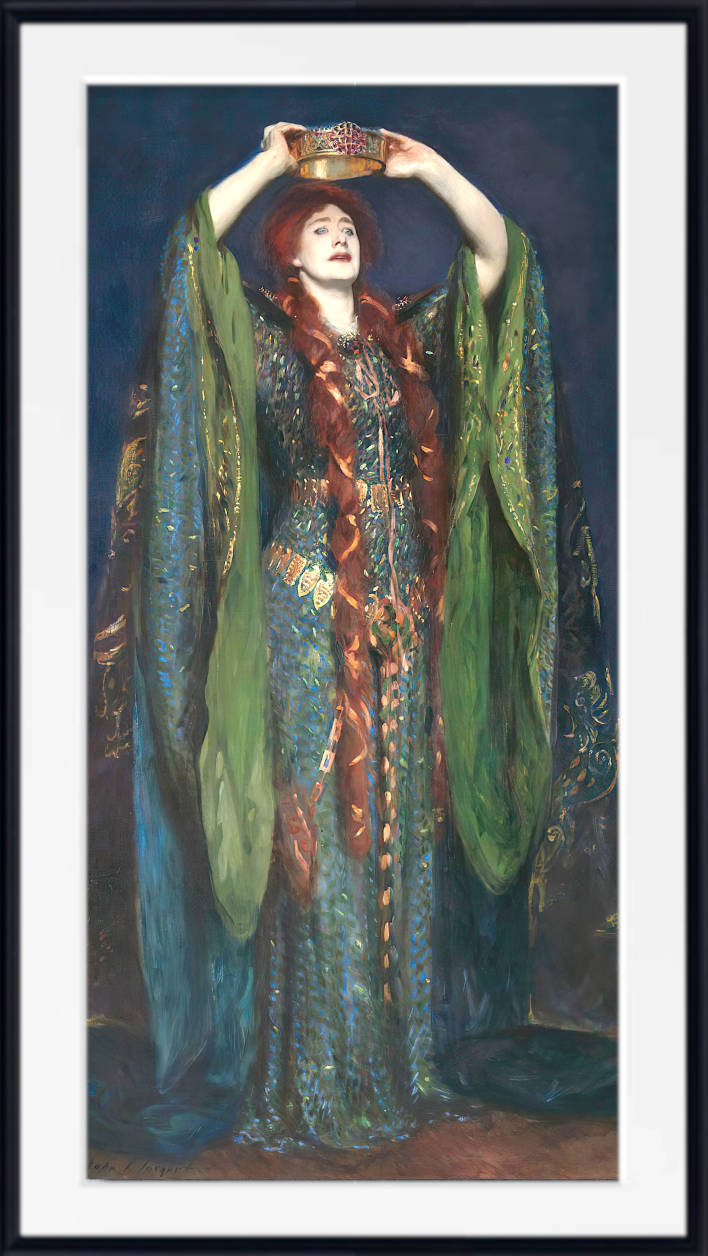
lady macbeth dress John Singer Sargent Print, Ellen Terry as Lady Macbeth – GalleryThaneJohn Singer Sargent Print, Ellen Terry as Lady Macbeth Bring theatrical drama and late Victorian elegance into your space with high quality prints and canvas panels of Ellen Terry as Lady Macbeth by John Singer Sargent. Painted in 1889, this iconic portrait captures the legendary actress Ellen Terry at the height of her career, resplendent in an iridescent beetle wing gown, embodying both Shakespearean power and Aesthetic Movement refinement. Our John

John Singer Sargent Print, Ellen Terry as Lady Macbeth

Bring theatrical drama and late-Victorian elegance into your space with high-quality prints and canvas panels of Ellen Terry as Lady Macbeth by John Singer Sargent. Painted in 1889, this iconic portrait captures the legendary actress Ellen Terry at the height of her career, resplendent in an iridescent beetle-wing gown, embodying both Shakespearean power and Aesthetic Movement refinement.

Our John Singer Sargent art prints are meticulously reproduced to preserve the original’s luminous colour, rich texture, and commanding presence. Available as premium giclée prints or ready-to-hang canvas panels, this masterpiece makes a striking statement in living rooms, studies, libraries, and theatre-inspired interiors.


Why Choose Ellen Terry as Lady Macbeth Wall Art?

  • Museum-quality John Singer Sargent prints with exceptional colour accuracy

  • Fine art canvas panels for a bold, contemporary presentation

  • Ideal for lovers of Victorian art, Shakespeare, and portrait painting

  • A timeless focal point for classic and modern interiors alike

About the Painting: Ellen Terry as Lady Macbeth

Painted after Terry’s acclaimed performance as Lady Macbeth, Sargent’s portrait goes beyond likeness. The dramatic pose, intense gaze, and shimmering costume transform the sitter into a symbol of ambition, charisma, and tragic power. This painting is widely regarded as one of Sargent’s most daring and psychologically complex portraits, making it a favourite among collectors of classic fine art prints.


John Singer Sargent Biography

A Master of Portraiture

John Singer Sargent (1856–1925) was an American-born artist who became the leading portrait painter of his era. Trained in Paris and active across Europe, Sargent was renowned for capturing the elite, intellectuals, artists, and performers of the late 19th and early 20th centuries. His work bridges American, British, and European art traditions, securing his reputation as one of the greatest painters of the Belle Époque.


John Singer Sargent Painting Style

Luminous, Confident, and Modern

Sargent’s painting style is defined by fluid brushwork, dramatic lighting, and an extraordinary ability to convey character. Influenced by Velázquez and Impressionism, he combined realism with painterly freedom. In Ellen Terry as Lady Macbeth, Sargent’s bold handling of paint and theatrical composition exemplify why John Singer Sargent paintings remain highly sought after as fine art wall decor.


Premium Prints & Canvas Panels

Choose from archival paper prints for a refined, gallery-style look or canvas panels that emphasise texture and depth. Both options are produced using fade-resistant inks, ensuring your John Singer Sargent wall art remains vibrant for years to come.


Frequently Asked Questions (FAQ)

Is Ellen Terry as Lady Macbeth a famous John Singer Sargent painting?

Yes. It is one of Sargent’s most celebrated portraits and a standout work of Victorian portraiture.

Are these John Singer Sargent prints suitable for modern interiors?

Absolutely. The dramatic composition and rich colour palette work beautifully in both traditional and contemporary spaces.

What is the difference between a print and a canvas panel?

Fine art prints offer a classic, framed appearance, while canvas panels provide a modern, frameless, ready-to-hang option.

Are these museum-quality reproductions?

Yes. Our John Singer Sargent art reproductions are created using high-resolution scans and archival materials for exceptional quality.

Is this artwork ideal as a gift?

Yes. Sargent wall art is a thoughtful gift for art lovers, theatre enthusiasts, and admirers of Shakespearean history.

Available as a fine art print and as a stretched canvas panel (heavy fine art canvas stretched over 1.5 inch deep edge solid wood frame)

Have your prints or canvas panels professionally framed with our custom-made wooden frames hand crafted in our workshop from responsibly sourced timber.


All prints are made using archival art stocks and UV pigment inks to give up to 200 years life. Prints are sold unframed and unmounted.

Quick Comparison: Finding Your Perfect Style

Art Style Best For... Visual Impact Recommended Room
Expressionism Open floor plans Bold, emotional focal point Living Rooms / Entryways
Nordic & Scandinavian Hygge-inspired interiors Muted tones and "Lagom" balance Bedrooms / Cozy Nooks
Botanical & Nature High-stress spaces Biophilic calm and relaxation Home Offices / Nurseries
Impressionism Prints Soft, airy aesthetics Dynamic light and gentle movement Dining Rooms / Guest Rooms
Geometric Modern Architectural interest Reinforces clean lines Studios / Hallways
Shipping Notes
  • Free Standard Shipping on $100+ Orders to the USA.
  • Except Preorder products are shipped in 48 hours.
  • Delivery to the USA:
  1. Standard Shipping : 3-10 business days
  • If time is of the essence, please consider selecting expedited delivery for faster service.
Exchange/Return Notes
  • We offer a 30-day return/exchange service after receiving.
  • Final sale items are not eligible for returns or exchanges.
  • To process your return/exchange, please contact us at [email protected]
  • Please click here for more details>>> Return & Exchange Policy
SKU: 59019190516

Discover Niche Categories That Outsell lady macbeth dress

Top-Converting Item to Boost Your Average Order

4.5 ★★★★★
Based on 679 reviews
Sort
Highest Rating
Newest First
Oldest First
Product Reviews
L
Verified Purchase
L. Yu
Waukegan, US
★★★★★ 4
pretty good banana plugs
Size: 5 Pack, Pattern Name: Banana Plugs
i bought these over 6 months ago and i just installed them to the front left and right floor standing speakers - sony ssf-7000 i have them for over 10 years hooked up to a yamaha 7.1 AVR. alot of people have had trouble installing this - one single banana plug comes in 3 parts - the bottom and top (the banana plug tip) can be unscrewed. what i did was tightened the top first (top being the tip of the banana plug) then unscrew the bottom off completely - make sure you have like 3/4" - 1" (depending on your gauge of wire) of exposed speaker wire that is straight - then thread it through the hole at the bottom up - i then rolled the exposed 3/4 - 1" exposed copper wiring into a ball that is bigger than the hole of the banana plug bottom piece so the wire doesn't fall back through where it came from. then i screwed on the top and middle piece back with the bottom piece - tightening it a bit so i know there's good contact. also make sure the tip is screwed in all the way as well as a double check. what you don't want to do is have the copper wire touch the threaded part of the bottom piece - the wire will cut off from the screwing action. i plugged it into my sony speakers and it wasn't a real snug fit - a bit too loose to feel secure - it didn't seem to go all the way in - but it fit fairly well in my receiver. my intention was to use these banana plugs with my 2 channel set up but i decided to go pre-constructed mediabridge 12 AWG speaker cable instead - those fit my 2 channel set up on my receiver and elacs really snug and secure. i tested it and it works fine. i didn't hear any loss of signal or any extraneous noise. none of my (14 awg?) wiring fell through the bottom and it sounds good. so no complaints there. i bought 5 pairs - but i find that it is an odd number to include a package - even numbered pairs would be better. anyway they seem constructed well - easy enough to install and they do work. thanks for reading
WAS THIS REVIEW HELPFUL?YesReportShare
Reviewed in the United States on September 12, 2019
A
Verified Purchase
AB
Lake Worth, US
★★★★★ 5
High quality and robust
Size: 12 Pairs, Pattern Name: Banana Plugs
Easily the best plugs I've found at a reasonable price. Solid feeling with good quality and they look good with easy to see red/black labeling. The tips tend to unscrew too easily, but this is a non-issue when they are in use, just something you have to be careful not to lose when assembling. It's a bit tricky to spread the wire out evenly at the exact right length. If screwing the plug together is hard at all, go back and shorten how much wire you bend over the lip.
WAS THIS REVIEW HELPFUL?YesReportShare
Reviewed in the United States on June 16, 2025
W
Verified Purchase
William
Carnegie, US
★★★★★ 5
Solid banana clips
Size: 5 Pack, Pattern Name: Banana Plugs
Ah yes, I used these solid banana plugs to convert my wires. It’s pretty easy to set up once the wire housing has been stripped and really cleans things up nicely. I haven’t had any discernable hissing, noise problems, or connection issues.
WAS THIS REVIEW HELPFUL?YesReportShare
Reviewed in the United States on May 25, 2026
L
Verified Purchase
Leyland Cypress
Birmingham, US
★★★★★ 3
Get the right wire guage
Size: 1 Count (Pack of 1), Pattern Name: Banana Plugs
I rate the banana plugs themselves 4 stars. They are everything I expected and work as advertised. It's the experience of assembly that I rate three stars. The way these work is -- you strip off the outer insullation of your wire and separate the two leads (positive and negative). Then you strip some length of insulation off the end of one of your leads, you unscrew the banana plug so that it separates into its respective base (lower) and contact (upper) halves, you slip the wire up through the base, you flare the copper strands of the wire and fold the individual strands over the very top of the base (about 1/16 of an inch) (taking care not to extend the strands over the threaded barrel of the base), then you screw the upper contact onto the lower base and voila, banana plug / wire assembly. It's not as complicated as it sounds. Go to the Monoprice website and watch their excellent instructional video. Here's the thing though. While the assembly is not complicated, it is tricky, and if you don't get your proportions right the first or second or third time, you'll have to do it over. Fist of all, if your wire guage is relatively thin, like my 16-guage speaker wire, you'll find that the entire wire, insullation and all, will slip right through the base of the plug without butting up against the bottom of the base. If this is the case, then the wire is left to sort of flop around inside the plug and that has a kind of unfinished, amateur look and feel to it, whereas if the wire butts up against the bottom of the base, it has a solid, one-piece professional look. So, to my mind, there's a sweet-spot for wire guage that works best with this plug -- not too thin and not too thick. And since Monoprice has debunked the thicker-is-better myth (the quality of the copper is the real determinant), then you should feel free to get the wire guage that fits the plug. Next -- and here's where it gets tricky -- once your copper extends beyond the top of the base, you'll need to limit this extension to about a sixteenth (no greatrer than a fourth) of an inch. Then you very delicately flare out the individual strands, in a 360- degree arc, and fold the strands over the top of the base. This takes a fair degree of manual dexterity, especially if the wire is "floating" inside the base and its travel is not stopped where the insullation meets the base. You'll have to hold the wire and base steady in the fingers of one hand, then flare out the wire strands with either your fingers or a suitable object (the working end of a ball-point pen worked for me) with the other hand. This one-sixteenth measure is important. If you extend wire strands beyond the top and over the threads of the base, you'll find that screwing the contact end onto the base is impossible and you'll need to start over. One or two strands is OK and almost unavoidable. In that case the screwing will catch but if you take a pair of pliers to it you can muscle through. By the way, you can avoid the whole mess by getting the open-screw type, which I'm sure will work just as well without any of the hassle of assembly. Like anything else, if you do it a few times to make the mistakes and learn the tricks, then it will become second nature, and if you've already done that, then my review might seem overly fussy. In that case feel free to leave comments to help other readers.
WAS THIS REVIEW HELPFUL?YesReportShare
Reviewed in the United States on October 15, 2012
J
Verified Purchase
JBDoge
Fort Morgan, US
★★★★★ 5
Wish they came with instructions...
They are cheap and work great. They plug right into my Pioneer vsx521 receiver and my Paradigm Atom monitor speakers. I wish they came with instructions, because it took me about 10 minutes to realize the bottom part unscrews in addition to the top part. Here are my instructions for installation: 1) Unscrew the bottom part of this connector (the thin metal underneath the red/black ring). 2) Make sure the Banana Plug (which may be loosely screwed into the top part of the connector) is fully tightened down 3) Strip your wire tips to 3/8 of an inch (or just slightly under) 4) Run the first newly stripped wire end through the bottom part you removed in step 1, such that the stripped end of the wire is entering through the flat end and exiting through the smaller threaded end. 5) Leave about 1/8 to 3/16 of an inch of stripped wire hanging past the exit hole. 6) As evenly spaced as possible, bend the over-hanging wire strands over the exit hole (all around it, like a hat). If done properly, the wire should not fall out if you give it a VERY GENTLE tug. 7) Screw the top metal part (with the actual banana plug) back onto the bottom part. It may be difficult if your stripped wire is hanging too low. I've used a pair of pliers to grip the bottom part of the connector while I twist the banana plug side with my hand. If done correctly, you should be able to put a lot of tension between the wire and connector without removing/damaging it. UPDATE: I just recently helped my dad install his 5.1 system without these... it sucked... This item (5 pairs of them in this case) and a good wire stripper can save you alot of pain (both physical and mental). The connectors on the back of his receiver are the kind where bare wire comes in from the side and then the connectors screw down (with a banana plug hole in the center which is where this product would come into play). I felt like a surgeon trying to get a bare wire end into the little slot, and then holding it there while I tighten the connector which is almost impossible since they are so close together... GET THESE!
WAS THIS REVIEW HELPFUL?YesReportShare
Reviewed in the United States on February 8, 2012

recommand products